Earlier this week, I worked on a web application development project that required me to install WordPress on Amazon AWS EC2. The client requirements specified using CentOS. So I needed to create a new EC2 instance, install Apache, PHP, and MariaDB before installing WordPress. In the process, I referred to multiple tutorials to refresh my Amazon AWS knowledge, and Linux shell commands skills. Since this process can sometimes be tedious or even frustrating for those who usually use ready-to-go shared web hosting or VPS on popular hosting providers, I’ve decided to compile my notes and share step-by-step instructions here for reference. This article will show you how to step-up an AWS EC2 CentOS instance then configure this image to install and run WordPress.
This outline assumes you already have an Amazon AWS account. The following steps will show you how to navigate to EC2 in the AWS Management Console and use the EC2 Dashboard to launch a new instance with a CentOS 7 image.
Amazon Web Services EC2
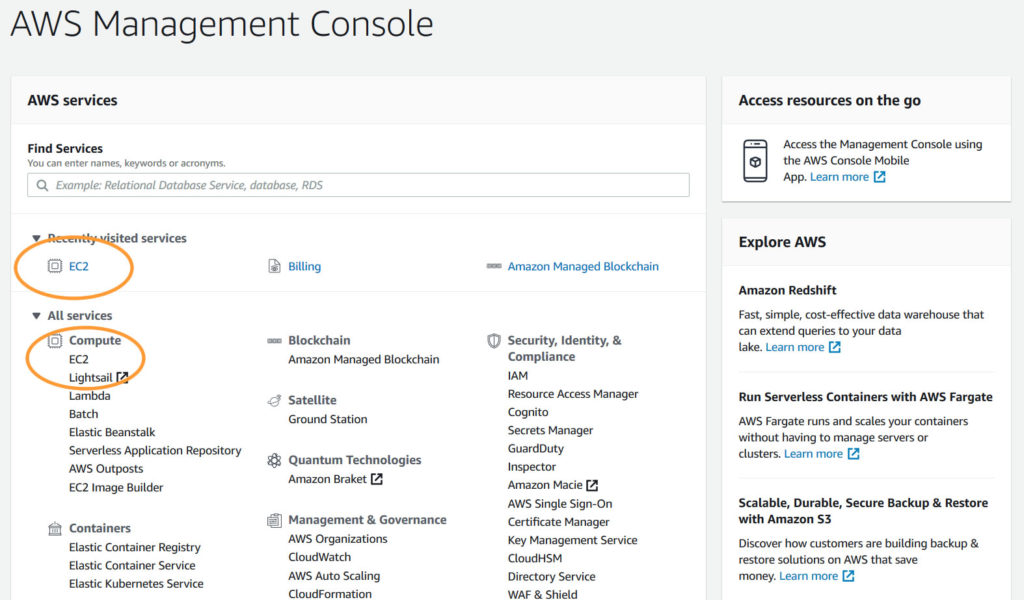
Once signed in to AWS and in the AWS Management Console find and click on the ‘EC2’ service as shown in the following screenshot:
(The links to EC2 are in the orange circles in the above screenshot.)
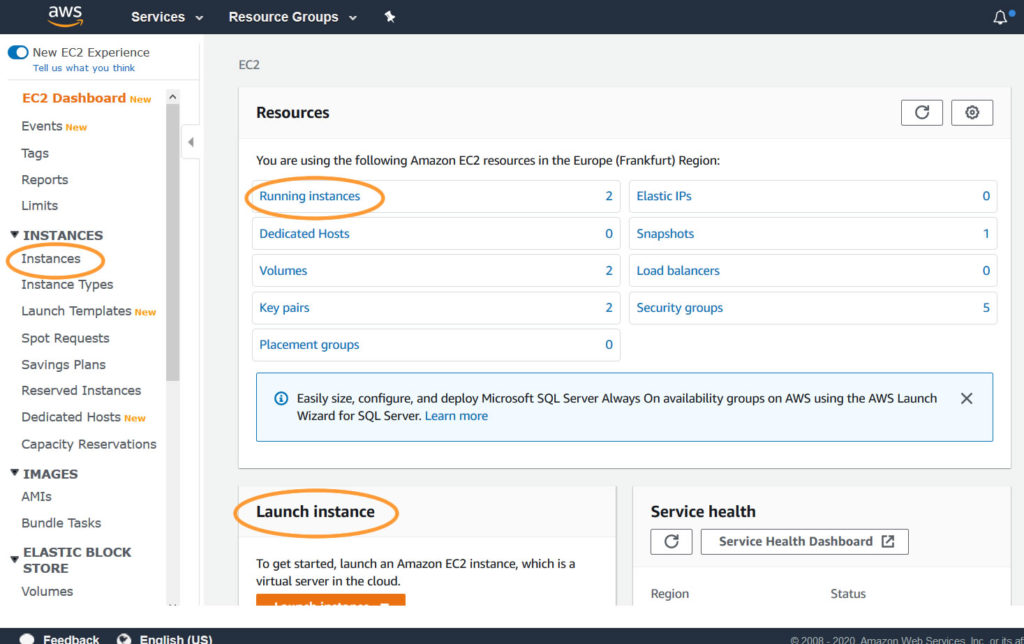
The following illustration displays the Amazon AWS EC2 Dashboard. Here in the EC2 Dashboard, you will see a few places where you can click to view your current EC2 Instances or launch a new EC2 Instance.
After clicking on the “Launch Instance” button from the EC2 Dashboard or the Instances page, you will go through the following steps to set up and configure your new EC2 Instance:
- Choose AMI (Amazon Machine Language)
- Choose Instance Type
- Configure Instance
- Add Storage
- Add Tags
- Configure Security Group
- Review
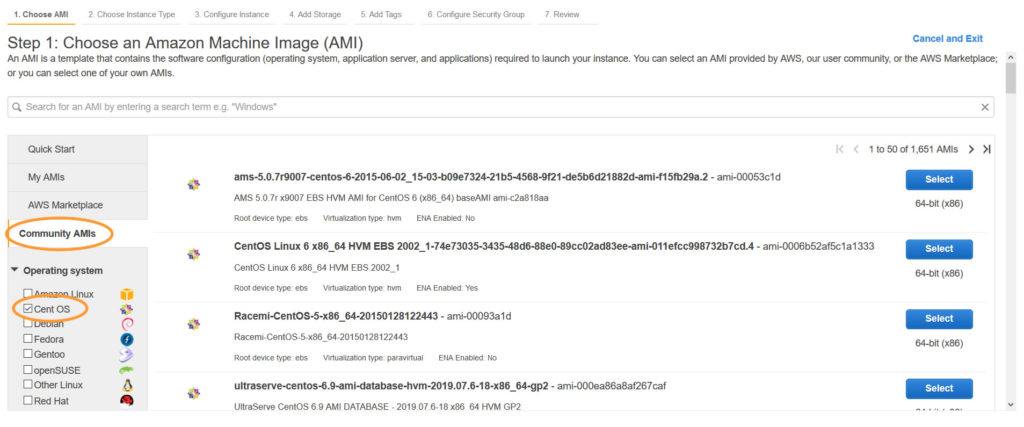
The first step in launching an instance is where you will choose an Amazon Machine Image (AMI). An Amazon Machine Image is a template of an operating system. AMI’s are available in different Linux and Windows distributions. I was able to find CentOS distributions in the Community AMIs.
Another thing to note when launching a new instance is port 80 for HTTP and port 443 for HTTPS both need to be open. Setting both ports is required for Apache to accept incoming traffic and display your WordPress site.
The following commands are through the command prompt via SSH:
Remi Repository
The first command will install and enable the Remi repository.
|
1 |
sudo yum -y install http://rpms.remirepo.net/enterprise/remi-release-7.rpm |
Disable PHP 5.4 and Enable PHP 7.3
The following commands will use the yum-util tool to configure the proper version of PHP to use.
|
1 2 3 |
sudo yum install yum-utils sudo yum-config-manager --disable remi-php54 sudo yum-config-manager --enable remi-php73 |
Installing the LAMP Stack
This command will install all of the required packages to set up a LAMP environment.
|
1 |
sudo yum install httpd mariadb mariadb-server php php-common php-mysql php-gd php-xml php-mbstring php-mcrypt |
MariaDB
Start and Secure MariaDB
Now that the LAMP Stack installation is complete we will start and secure MariaDB.
|
1 |
sudo systemctl start mariadb |
MariaDB Database Security
You will answer questions related to the security of MariaDB. Provide a new root user password and answer yes to all of the questions.
|
1 |
sudo mysql_secure_installation |
Enable MariaDB
Make sure to enable MariaDB it will start automatically when you restart the system or that is, on system boot.
|
1 |
sudo systemctl enable mariadb |
Creating Database
The following commands will create a database and a database user that will be needed to eventually install WordPress. First, we will start by logging into the database server. This command will prompt you to enter the ‘root’ user password you had specified when securing the MariaDB installation.
|
1 |
sudo mysql -u root -p |
Database, User, and Privileges
Once using MariaDB, create a database, create a user, grant privileges to the user, refresh user privileges, and exit.
|
1 2 3 4 5 |
CREATE DATABASE wpdb; CREATE USER wpuser@localhost IDENTIFIED BY "secure_password"; GRANT ALL ON wpdb.* TO wpuser@localhost; FLUSH PRIVILEGES; exit |
( NOTE: of course where it says “secure_password” you will want to make sure to provide your password for your database user )
Apache Web Server
Start and Enable Apache Webserver
The following commands will start Apache Webserver and make sure that it starts automatically when you restart or reboot the CentOS system.
|
1 2 |
sudo systemctl start httpd sudo systemctl enable httpd |
WordPress CMS (Content Management System)
WordPress Installation
These commands will download the latest version of WordPress and extract the archive into the web directory.
|
1 2 |
sudo cd /tmp && wget http://wordpress.org/latest.tar.gz sudo tar -xvzf latest.tar.gz -C /var/www/html |
( NOTE: the WordPress files will be extracted to the following directory ‘/var/www/html/wordpress’ )
WordPress Directory
Change owner of the ‘wordpress’ directory to the user ‘apache’.
|
1 |
chown -R apache /var/www/html/wordpress |
Virtual Host
Creating Apache Virtual Host for WordPress
Using ‘vim’ or another text editor, an Apache virtual host needs to be created for the WordPress Install.
|
1 |
sudo vim /etc/httpd/conf/httpd.conf |
Editing Apache Configuration File
Add the code below to the end of the ‘httpd.conf’ file with information that is related to your installation.
|
1 2 3 |
<VirtualHost *:80> DocumentRoot /var/www/html/wordpress </VirtualHost> |
Restart Apache
The last command in SSH / command prompt is to restart Apache so the configuration changes are live.
|
1 |
sudo systemctl restart httpd |


